Propagation by Seed
What is propagation by seed?

Propagation by seed is a form of sexual reproduction. Unlike vegetative propagation, such as cuttings or division, seed is produced following the reproductive process involving genetic material from parent plants.
This means plants grown from seed are not necessarily genetically identical to the parent plant.
Seed propagation is one of the most important methods of producing plants and is used for:
- vegetables
- annual flowers
- herbaceous plants
- trees
- shrubs
- wildflowers
- crops
For a horticulturist, successful seed sowing depends on understanding both the seed and the conditions needed for germination.
What is a Seed?
A seed contains a developing plant, together with stored food reserves and a protective covering.
The basic structures include:
- seed coat – protects the seed
- embryo – the young developing plant
- food reserves – provide energy during early development
When suitable conditions are provided, the seed absorbs water and begins to germinate.
The process can be simplified as:
Water + oxygen + suitable temperature → germination → root → shoot → seedling
Light is also important for many species, particularly after germination, although not every seed requires light to germinate.
Seed Size Matters
Seed size has a direct effect on how it should be handled and sown.
For practical horticulture, seeds can be broadly divided into:
Large seed
Examples:
- sweet pea
- broad bean
- runner bean
- sunflower
- acorn
Medium seed
Examples:
- pea
- French bean
- nasturtium
- calendula
- many vegetable and flower seeds
Small seed
Examples:
- lettuce
- carrot
- poppy
- foxglove
- many herbs
- many wildflower species
These categories are not strict botanical classifications. They are useful practical sowing categories.
Large Seed
Large seeds are easier to handle individually.
They can usually be:
- picked up by hand
- spaced accurately
- pushed into the soil
- covered relatively deeply
Large seeds generally contain larger food reserves.
This allows the emerging seedling to push through a greater depth of growing medium.
Typical technique
A hole or drill is made to the appropriate depth.
The seed is placed into the hole.
The soil is drawn over the seed and gently firmed.
For many large seeds, sowing depth is often around 2–3 times the seed’s diameter, although the correct depth depends on the species.
Medium Seed
Medium-sized seeds can usually be handled individually or sown using controlled methods.
Examples include many:
- vegetables
- lettuce
- carrots
- annual flowers
- herbs
They generally require a shallower sowing depth than large seeds.
The seed should have sufficient contact with the growing medium without being buried excessively.
A useful principle is:
Small seed → shallow sowing.
Large seed → deeper sowing.
However, always check the requirements of the individual species.
Small / Fine Seed
Small seed presents a different challenge.
It may be difficult to pick up and space individually.
Examples include:
- Papaver
- Digitalis
- Lobelia
- some herbs
Small seed is generally sown very shallowly – sometimes just on the surface.
Some seed may only require a light covering of compost or fine soil or none at all.
Very small seeds may even require light to germinate and should be sown on the surface or covered only very lightly, depending on the species.
Comparing Seed Sizes
| Seed size | Handling | Typical sowing depth | Common technique |
| Large | Easy to handle individually | Relatively deep | Individual holes or deep drill |
| Medium | Usually manageable individually | Moderate | Shallow drill or individual sowing |
| Small | Difficult to handle individually | Very shallow | Fine drill, surface sowing or careful broadcasting |
Never assume all seed should be sown at the same depth.
The size of the seed gives the gardener an important clue.
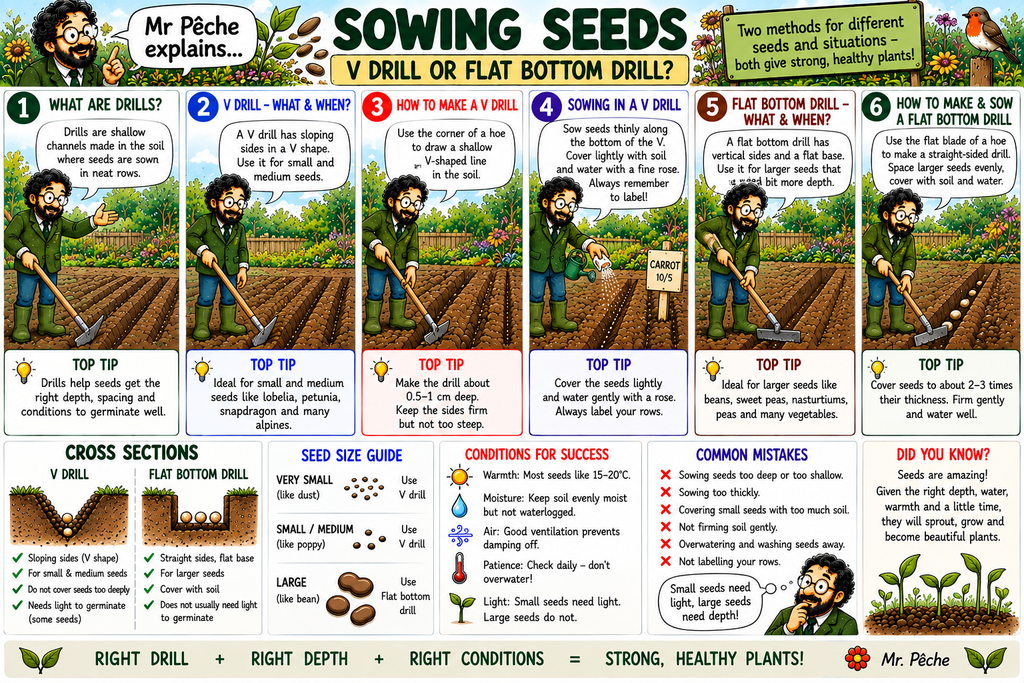
What is a Drill?
A drill is a shallow channel made in the soil into which seed is sown.
Drills make sowing more controlled and organised.
They allow the gardener to:
- control sowing depth
- create straight rows
- space plants consistently
- identify the crop
- distinguish seedlings from weeds
- cultivate between rows
- water accurately
- monitor germination
Drills can have different shapes.
Flat-Bottom Drill
A flat-bottom drill has a relatively flat base.
It can be useful where the gardener wants to create a consistent shallow sowing zone.
The seed sits along the bottom of the drill.
A simple cross-section looks like:
Soil surface
________________________
_________
| |
| SEED |
_____|_________|________
Advantages
- provides a consistent sowing depth
- suitable for certain medium-sized seed
- gives good contact between seed and soil
- relatively simple to create
The drill should not be excessively deep.
V-Drill
A V-shaped drill has sloping sides that meet towards the bottom.
Soil surface
________________________
\ /
\ /
\ /
\_/
●
SEED
The V-shape can help position seed towards the base of the drill.
It is particularly useful for accurate sowing of small quantities of seed.
The depth should still be appropriate for the species.
A V-shaped drill is not automatically better than a flat-bottom drill.
The choice depends on:
- seed size
- soil condition
- crop
- sowing method
- desired spacing
Why Sow in Lines?
Sowing in lines is not simply about making the garden look tidy.
Straight rows provide several practical advantages.
1. Easier identification
Seedlings appear in a predictable line.
This helps distinguish them from weeds.
2. Easier weeding
The gardener can hoe or cultivate between rows without disturbing the crop.
3. Easier maintenance
Watering, thinning and monitoring become easier.
4. Consistent spacing
Plants have more predictable access to:
- light
- water
- nutrients
- space
5. Easier harvesting
Rows make crops easier to locate and harvest.
6. Better use of space
The gardener can plan plant spacing rather than allowing plants to compete randomly.
Why Sow in Staggered Rows?
Staggered sowing means that plants in adjacent rows are offset rather than directly opposite one another.
For example:
Row 1: ● ● ● ●
Row 2: ● ● ● ●
Row 3: ● ● ● ●
This can improve the use of available space.
When plants are staggered:
- there may be less direct competition between neighbouring plants
- the available growing area can be used more efficiently
- leaves may have improved access to light
- root systems may have more evenly distributed growing space
Staggered spacing is particularly useful when plants are grown relatively close together.

Lines vs Broadcasting
There are two broad approaches to sowing.
Row sowing
Seed is placed in organised rows.
Advantages:
- easy to identify
- easy to weed
- easy to thin
- controlled spacing
- easier crop management
Broadcasting
Seed is scattered across an area.
This is commonly used for:
- wildflower areas
- lawns
- some green manures
- certain ornamental displays
Broadcasting can produce a more natural appearance, but accurate spacing and subsequent weeding become more difficult.
Seedbed Preparation
Successful seed propagation begins before the seed is sown.
The seedbed should generally be:
- free from large weeds
- reasonably fine and friable
- adequately moist
- free from large stones and debris
- suitable for the crop
A fine seedbed is particularly important for small seed.
Large clods can create problems because small seeds can fall into deep gaps and become buried too deeply.

Why Soil Structure Matters
Seed requires close contact with the growing medium.
Too many large air gaps can prevent consistent moisture around the seed.
However, excessive compaction can reduce oxygen availability and restrict emerging roots.
The ideal seedbed provides:
Moisture + oxygen + contact + suitable temperature
This is why soil preparation matters so much.
Sowing the Seed
Step 1 — Prepare the area
Remove weeds and prepare a suitable seedbed.
Step 2 — Mark the row
Use a line or marker to create a straight row.
Step 3 — Create the drill
Make either the appropriate flat-bottom or V-shaped drill.
Step 4 — Sow the seed
Place the seed at the correct spacing.
Step 5 — Cover
Cover with an appropriate depth of fine soil or compost.
Step 6 — Firm
Gently firm the surface to ensure good contact.
Step 7 — Water
Water carefully without washing the seed away.
Step 8 — Label
Record:
- plant name
- variety
- date
- sowing method
Thinning
Seeds are often sown more closely than the final plants require.
Once seedlings have emerged, they may need to be thinned.
Thinning involves removing some seedlings so that the remaining plants have sufficient space.
This is particularly important where direct-sown crops have been sown in rows.
The gardener should avoid pulling neighbouring seedlings out of the soil accidentally.
A useful technique is to remove unwanted seedlings carefully while the soil is moist enough for easy removal.
Germination Requirements
Different seeds have different requirements, but the main factors are:
Water
The seed must absorb water before germination can begin.
Oxygen
Respiration is required to provide energy for growth.
Temperature
Each species has a suitable temperature range for germination.
Light
Some seeds germinate better in darkness, some require light, and many are relatively unaffected within a suitable range.
Therefore:
Always check the requirements of the individual seed.
Seed Dormancy
Some seeds do not germinate immediately even when conditions appear suitable.
This may be because they are dormant.
Dormancy can be broken using treatments such as:
- stratification
- scarification
- soaking
- alternating temperatures
- exposure to light or darkness
These techniques are species-specific.

Direct Sowing vs Sowing Under Protection
Direct sowing
Seed is sown directly into the final growing position.
Advantages
- less transplanting
- less root disturbance
- simple
- useful for many vegetables and hardy annuals
Disadvantages
- seedlings exposed to pests and weather
- weeds compete directly with seedlings
- germination can be less reliable in poor conditions
Sowing under protection
Seed is sown in:
- trays
- modules
- pots
- propagators
- greenhouses
Advantages
- greater environmental control
- protection from adverse weather
- easier monitoring
Disadvantages
- additional equipment
- seedlings eventually need transplanting
- risk of damping off if conditions are poorly managed
PPE and Health & Safety
Seed sowing is generally a low-risk task, but normal horticultural precautions still apply.
| Activity | Hazard | Control / PPE |
| Preparing soil | Dust | Avoid creating dust; suitable gloves |
| Using hand tools | Cuts | Use tools correctly; keep them maintained |
| Handling compost | Dust and microorganisms | Gloves; wash hands after use |
| Raking soil | Flying particles | Eye protection where appropriate |
| Repetitive sowing | Hand or wrist strain | Good working position; appropriate tools |
| Watering | Slips | Clean spills and maintain good housekeeping |

Common Mistakes
Sowing too deeply
This is particularly common with small seed.
Sowing too densely
Overcrowded seedlings compete for resources.
Poor soil preparation
Large clods make consistent sowing difficult.
Washing seed away
Heavy watering can move seed from its intended position.
Failing to label
Different seedlings can look remarkably similar.
Confusing seedlings with weeds
This is one reason straight rows are so useful.
Allowing the seedbed to dry out
Newly sown seed requires appropriate moisture.
Waterlogging
Too much water can reduce oxygen and encourage disease.
Practical Seed-Sowing Activity
Prepare and sow a seedbed
Plant: ______________________________
Seed size: Large / Medium / Small
Date: ______________________________
Sowing method: Direct / Protected
Drill type: Flat-bottom / V-shaped / Other
Row spacing: _________________________
Seed spacing: ________________________
Sowing depth: ________________________
PPE used: ____________________________
Student Observation
Why was this sowing depth selected?
Why was this drill shape selected?
Why were the seeds sown in lines?
Would staggered rows be useful for this crop?
What could happen if the seed were sown too deeply?
Seed Size Challenge
Match the seed to the likely sowing technique.
A — Large seed
Sweet pea
Likely technique:
B — Medium seed
Calendula
Likely technique:
C — Small seed
Poppy
Likely technique:
Now explain:
Why should the three seeds not necessarily be sown at the same depth?
Remember
Good seed sowing is not simply:
“Put seed in soil.”
It is about giving every seed the best possible opportunity to germinate.
Think about:
Seed size → sowing depth → spacing → soil condition → moisture → temperature → light
The shape of the drill matters because it helps control where the seed sits.
The arrangement of the rows matters because it affects how the crop will be managed.
And the size of the seed matters because a tiny seed does not have the same resources as a large seedling embryo.
A professional horticulturist therefore does not sow every seed in the same way.
Look at the seed. Understand the plant. Then choose the technique.
Key references
- Royal Horticultural Society (RHS), guidance on sowing seed and raising plants from seed.
- Royal Horticultural Society (RHS), Raising Plants from Seed.
- Hartmann, H.T. et al., Plant Propagation: Principles and Practices.
- Bewley, J.D. et al., Seeds: Physiology of Development, Germination and Dormancy.
- Taiz, L. et al., Plant Physiology and Development.
- Health and Safety Executive (HSE), guidance on safe use of hand tools and horticultural materials.