PROPOGATION
Plants propagate naturally, by sexual means (seed) and also by asexual means (rooting, layering, suckering, or by other natural processes). As gardeners we try and utilize these methods to speed up processes and create new plants.
Natural Plant Propagation: How Plants Reproduce Themselves
1. Introduction
Plants have developed several ways to reproduce and spread without human intervention. Natural propagation allows plants to colonise new areas, survive changing conditions and maintain populations. These methods can be divided into sexual propagation, which involves seeds, and vegetative propagation, which produces new plants from existing plant parts.
2. Seed propagation
Many plants reproduce sexually by producing seeds after fertilisation. Pollen reaches the female reproductive structure, fertilisation occurs, and a seed develops containing an embryo.
Seeds may be dispersed in several ways:
- Wind: light seeds or seeds with wings and hairs travel through the air. Examples include dandelion (Taraxacum officinale) and sycamore (Acer pseudoplatanus).
- Water: seeds or fruits float and are carried by water. Water lilies are an example of plants that can disperse seeds through water.
- Animals: seeds may stick to fur or clothing, or be eaten and later deposited elsewhere. Blackberries (Rubus fruticosus agg.) are dispersed in this way.
- Explosive dispersal: some seed pods split suddenly, scattering seeds away from the parent plant. Broom (Cytisus scoparius) is an example.
- Gravity: fruits or seeds fall to the ground beneath the parent plant, as with acorns from oak trees (Quercus species).
Seeds may remain dormant until suitable conditions, such as moisture, oxygen and temperature, allow germination.
3. Vegetative propagation
Vegetative propagation produces new plants from roots, stems, leaves or other vegetative structures. It does not require seeds or fertilisation, and the resulting plants are usually genetically very similar to the parent plant.
| Method | How it works | Examples |
|---|---|---|
| Runners | Stems grow horizontally and form new plantlets at nodes | Strawberry (Fragaria species) |
| Rhizomes | Underground stems spread and produce new shoots and roots | Iris (Iris species) |
| Tubers | Swollen underground stems store food and produce shoots from buds | Potato (Solanum tuberosum) |
| Bulbs | Underground storage structures produce new shoots and sometimes offsets | Daffodil (Narcissus species) |
| Corms | Swollen underground stem bases produce new growth and often daughter corms | Crocus (Crocus species) |
| Offsets | Small plantlets develop beside the parent plant | Aloe (Aloe species) |
| Suckers | New shoots develop from roots or the base of a plant | Raspberry (Rubus idaeus) |
Some plants also spread naturally when stems touch moist soil and form roots. This is called layering. Brambles and some climbing plants can spread in this way.
Bulbs


Rhizome

Corms

Offsets

Runners

Suckering & Layering

4. Why do plants use different methods?
Natural propagation helps plants survive and spread. Seed production can introduce genetic variation, which may help populations adapt to environmental change. Vegetative propagation can allow a successful plant to spread quickly in a suitable location.
However, vegetative propagation can also create problems in gardens. Plants such as Japanese knotweed (Reynoutria japonica) can spread from small fragments of rhizome. Gardeners must therefore understand how plants reproduce before dividing, moving or disposing of plant material.
Monoecious and Dioecious Plants

Monoecious plants have separate male and female flowers on the same individual plant. This means one plant can produce both pollen and ovules, although pollination may still require wind, insects or another agent. Examples include sweetcorn (Zea mays), with male flowers in the tassel and female flowers in the cobs, and cucumber (Cucumis sativus), which commonly has separate male and female flowers on the same plant.
Dioecious plants have male and female flowers on separate individual plants. A male plant produces pollen, while a female plant produces flowers with ovules and, in suitable species, fruit or seeds after pollination. Examples include holly (Ilex aquifolium) and ginkgo (Ginkgo biloba). To obtain berries from a female holly, a compatible male plant generally needs to be nearby.
Easy way to remember:
- Monoecious = male and female flowers on one plant.
- Dioecious = male and female flowers on different plants.
Diploid and Triploid Plants

Diploid plants (2n) have two complete sets of chromosomes in their cells, usually one set inherited from each parent. This is the most common chromosome arrangement in plants and allows many species to reproduce sexually and produce viable seeds.
Triploid plants (3n) have three complete sets of chromosomes. Because these chromosomes often cannot pair evenly during meiosis, triploid plants commonly have reduced fertility or are sterile. This can be useful in horticulture because some triploid plants produce little or no viable seed.
Examples in horticulture:
- Diploid: many apple varieties and wild plant species.
- Triploid: seedless bananas and some seedless watermelon varieties.
Triploidy can be particularly useful in fruit production, where seedlessness is desirable. However, triploid plants may need pollen from a compatible diploid variety to stimulate fruit development, as happens with some triploid watermelons.
Key point: Diploid means two sets of chromosomes; triploid means three. The extra chromosome set can affect fertility, seed production and other plant characteristics.
Haploid, Diploid, Triploid and Tetraploid Plants
Plants can have different numbers of complete chromosome sets. This is known as ploidy, and it can influence fertility, plant size, cell size and fruit characteristics.
| Type | Chromosome sets | Explanation |
|---|---|---|
| Haploid (n) | 1 | One complete set of chromosomes. Haploid cells commonly occur in pollen and egg cells. |
| Diploid (2n) | 2 | Two complete sets of chromosomes, the common condition in many plants. |
| Triploid (3n) | 3 | Three complete sets. These plants often have reduced fertility because their chromosomes cannot divide evenly during meiosis. |
| Tetraploid (4n) | 4 | Four complete sets. These plants may have larger cells and sometimes larger flowers, leaves or fruits. |
Why is this important in horticulture?
- Haploids can be used in plant breeding to develop fully homozygous lines through chromosome doubling.
- Diploids provide the usual chromosome arrangement for many plant species and varieties.
- Triploids are useful for producing seedless fruit, such as many commercial bananas and some watermelons.
- Tetraploids can have desirable ornamental or crop characteristics. Some cultivated chrysanthemums and other ornamental plants occur in polyploid forms.
Plants with more than two chromosome sets are described as polyploid. Polyploidy has played an important role in the evolution of many plant species and is also used by plant breeders to develop new varieties.
Remember: ploidy describes the number of complete chromosome sets, not the number of individual chromosomes. The effects vary between species, so extra chromosome sets do not automatically mean a plant will be bigger or more productive.
Hardwood Cuttings

What are hardwood cuttings?
Hardwood cuttings are a form of vegetative propagation. Instead of producing a new plant from seed, the gardener takes a section of mature, woody stem and encourages it to produce roots.
The important point is that the new plant is produced from part of the parent plant. It is therefore a clone of the parent, meaning it should retain the parent plant’s characteristics.
This makes hardwood cuttings particularly useful when a gardener wants to produce several plants that are genetically identical to a known, healthy parent.
Common plants that can be propagated from hardwood cuttings include:
- blackcurrants
- redcurrants
- gooseberries
- dogwood
- willow
- poplar
- roses
- Forsythia
- Buddleja
- some climbing plants and shrubs
Not every woody plant roots readily from hardwood cuttings, so the propagation requirements of the individual species should always be considered.
Why use hardwood cuttings?
There are several reasons why a horticulturist might choose hardwood cuttings rather than seed.
1. They produce genetically identical plants
Seed involves sexual reproduction and therefore introduces genetic variation.
A hardwood cutting is produced vegetatively and retains the characteristics of the parent plant.
This is particularly useful when propagating a plant with desirable:
- flower colour
- fruit quality
- growth habit
- foliage
- disease resistance
- ornamental characteristics
2. They are inexpensive
Hardwood cuttings require relatively little specialist equipment.
A gardener may only need:
- secateurs
- a sharp knife
- labels
- suitable growing medium
- pots or a nursery bed
This makes the technique particularly useful for producing large numbers of plants economically.
3. They make use of dormant material
Hardwood cuttings are generally taken during the dormant season, when the plant has finished its active growth for the year.
The cutting material is mature and woody rather than soft and green.
When are hardwood cuttings taken?
Hardwood cuttings are generally taken during the dormant season, usually from autumn through winter, depending on the plant and local conditions.
The exact timing is less important than the condition of the material.
The wood should generally be:
- mature
- healthy
- free from disease
- firm
- from the current season’s growth
- sufficiently woody to resist bending
Avoid material that is weak, damaged, diseased or excessively old.
Selecting the parent plant
Propagation begins before the secateurs are picked up.
The parent plant should be:
Healthy → vigorous → true to type → free from pests and disease
There is little point propagating a weak or diseased plant simply because it happens to be nearby.
The quality of the cutting depends heavily on the quality of the material from which it is taken.

How to take a hardwood cutting
A typical hardwood cutting is approximately 15–30 cm long, although the ideal size varies between species.
Step 1 — Select suitable material
Choose a healthy section of current-season woody growth.
Step 2 — Make the basal cut
Make a clean cut just below a node.
The node is important because it contains buds and tissues capable of producing new growth.
Step 3 — Make the top cut
Make a second cut above a node.
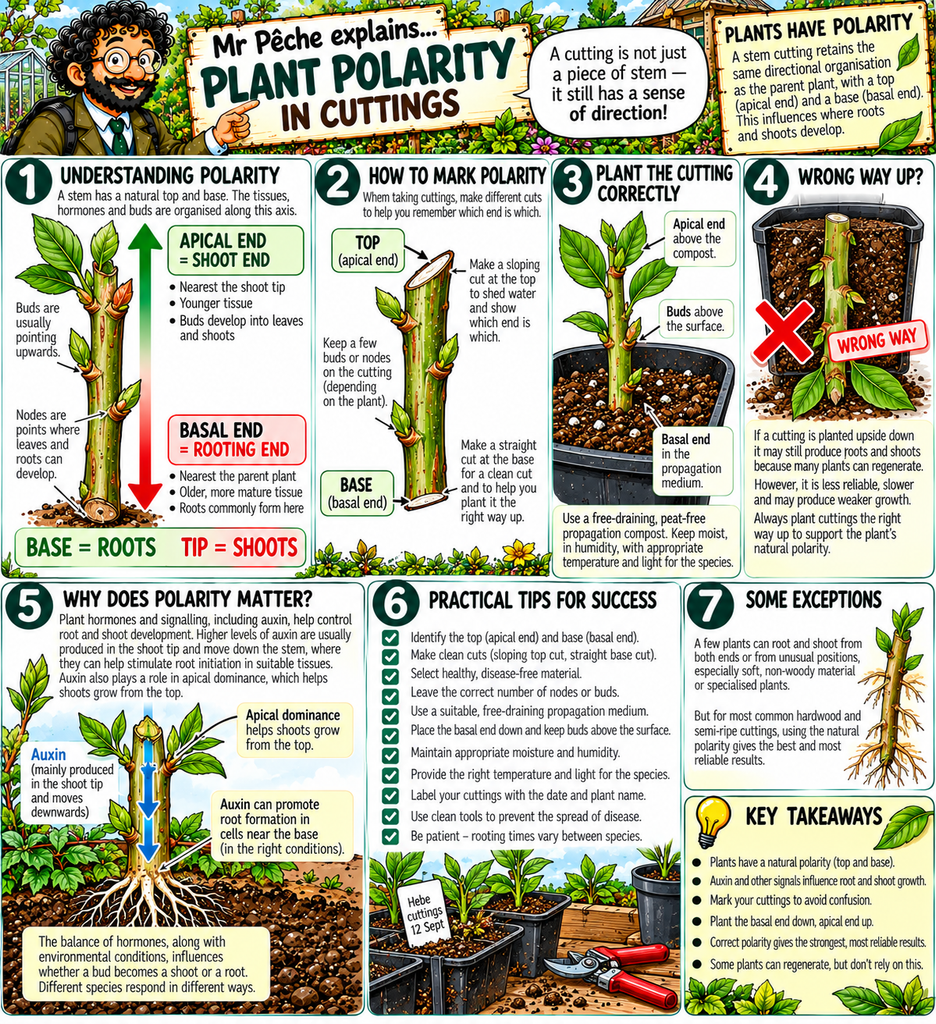
A useful practical technique is to make the top cut straight across and the bottom cut at an angle. This helps distinguish which end goes into the compost.
Never plant the cutting upside down.
Step 4 — Prepare the cutting
Remove excess leaves or side shoots if present.
Where appropriate, rooting hormone may be used, but it is not essential for every species.
Step 5 — Insert into the growing medium
Place the cutting into a suitable free-draining medium, leaving approximately one or two buds above the surface, depending on the species and method being used.
Step 6 — Firm the medium
Make sure the cutting has good contact with the growing medium.
Step 7 — Label
Record:
- plant name
- date
- source or parent plant if required
Step 8 — Protect and maintain
Keep the cuttings in suitable conditions and prevent them from drying out.
Some hardwood cuttings can be placed directly into a nursery bed outdoors. Others may be better started in containers.
What is happening inside the cutting?
A hardwood cutting may look like a piece of dead stick, but it contains living tissues and stored resources.
The cutting must produce adventitious roots before it can become an independent plant.
Once roots have developed, new shoots can grow from buds on the stem.
The sequence can be thought of as:
Cutting → callus formation → root development → shoot development → established plant
The cutting is therefore relying partly on stored energy while it develops the root system needed to support new growth.
Factors affecting success
Several environmental factors influence rooting.
Moisture
The cutting must not dry out, but excessive water can create waterlogged conditions and encourage decay.
Temperature
Rooting generally requires suitable temperatures. Cold conditions may slow the process considerably.
Oxygen
Roots require oxygen. A compacted or waterlogged growing medium can reduce air spaces and inhibit rooting.
Growing medium
A good rooting medium should provide:
- moisture
- drainage
- aeration
- physical support
Health of the cutting
Healthy, disease-free material is much more likely to succeed.
Hardwood Cuttings: Practical Equipment
| Equipment | Purpose |
| Secateurs | Cutting suitable stem material |
| Sharp knife | Making clean, accurate cuts where required |
| Pots or nursery bed | Providing a rooting environment |
| Growing medium | Supporting rooting |
| Labels | Identifying varieties and dates |
| Watering equipment | Maintaining suitable moisture |
| Rooting hormone | May encourage rooting in some species |
| Dibber | Creating planting holes |
| Clean work surface | Reducing contamination and keeping material organised |
PPE and Health & Safety
Propagation is relatively low risk compared with chainsaw work or machinery operation, but hazards still exist.
| Activity | Possible hazard | Typical PPE / control |
| Cutting stems | Cuts from secateurs or knives | Safety footwear; suitable gloves where appropriate; correct tool technique |
| Using a sharp knife | Severe cuts | Keep blade sharp; cut away from the body; use a suitable cutting technique |
| Handling woody material | Splinters, thorns | Gloves and long sleeves where appropriate |
| Handling growing media | Dust and microorganisms | Gloves; avoid creating dust; eye protection where there is a significant dust risk |
| Rooting hormone | Contact with substance | Follow product label and COSHH assessment; appropriate gloves/PPE where specified |
| Working outdoors | Cold, wet or uneven conditions | Suitable footwear and weather-appropriate clothing |
| Using secateurs | Repetitive strain or hand injury | Use correctly sized, sharp tools; avoid excessive force |
PPE should be selected following the risk assessment. It should not be regarded as a replacement for safe working methods.
Common Mistakes
Taking the wrong material
Old, weak or diseased wood is unlikely to produce good plants.
Taking cuttings at the wrong time
Some species root best when fully dormant, while others have different requirements.
Planting upside down
It sounds obvious, but it happens. The angled basal cut is a useful visual reminder.
Allowing cuttings to dry out
Once cut, propagation material should be handled carefully and protected from unnecessary drying.
Waterlogging
More water does not necessarily mean better rooting. Oxygen is also required.
Forgetting labels
A collection of identical-looking sticks becomes surprisingly difficult to identify several months later.
Using contaminated tools
Dirty cutting tools can transfer pathogens between plants.
Clean tools are therefore part of good propagation practice.
Hardwood Cuttings vs Seed
| Hardwood cuttings | Seed |
| Asexual propagation | Sexual propagation |
| Produces a genetic clone of the parent | Produces genetically variable offspring |
| Useful for maintaining desirable characteristics | Useful for producing genetic diversity |
| Usually inexpensive | Can be inexpensive but may take longer to produce flowering or fruiting plants |
| Parent characteristics are retained | Characteristics of offspring can vary |
| Not suitable for every plant | Many plants can be propagated by seed |
Student Practical Checklist
Before starting:
☐ Have I correctly identified the parent plant?
☐ Is the parent plant healthy?
☐ Am I using suitable mature wood?
☐ Is the material free from pests and disease?
☐ Are my secateurs clean and sharp?
☐ Do I know which end is the base?
☐ Have I made clean cuts?
☐ Is my growing medium suitable?
☐ Have I planted the cutting at the correct depth?
☐ Have I labelled it?
☐ Is the cutting protected from drying out?
☐ Have I considered drainage?
☐ Am I using the correct PPE?
Practical Activity
Take three hardwood cuttings from an approved parent plant.
Record:
Plant: ______________________________
Date: ______________________________
Parent plant location: ______________________________
Type of wood selected: ______________________________
Length of cutting: ______________________________
Number of nodes: ______________________________
Growing medium: ______________________________
Rooting conditions: ______________________________
PPE used: ______________________________
Why was this plant suitable for hardwood propagation?
Follow-up observation
After several weeks, examine your cuttings.
Record:
New roots observed: Yes / No
New shoots observed: Yes / No
Condition of cutting: ______________________________
Successful cuttings: ______________________________
Possible reasons for failure: ________________________
Remember
A hardwood cutting may look like nothing more than a piece of stick.
But inside that piece of wood are buds, living tissues and stored resources capable of producing an entirely new plant.
The skill of the horticulturist is to understand what the plant needs and provide the conditions in which that potential can be released.
Good propagation begins with good observation.
Key references
- Royal Horticultural Society (RHS), guidance on plant propagation and taking cuttings.
- Royal Horticultural Society (RHS), Propagation by Cuttings.
- Hartmann, H.T. et al., Plant Propagation: Principles and Practices, a standard horticultural reference on vegetative propagation.
- Toogood, A. (ed.), RHS Propagating Plants, Dorling Kindersley/RHS.
- Health and Safety Executive (HSE), guidance on safe use of hand tools and workplace PPE.
Softwood and Semi-Ripe Cuttings
What are softwood and semi-ripe cuttings?
Softwood and semi-ripe cuttings are methods of vegetative propagation. A section of a parent plant is removed and encouraged to produce roots, creating a new plant that is genetically identical to the parent.
The major difference from hardwood cuttings is the age and condition of the stem material.
Softwood cuttings are taken from young, actively growing shoots. Semi-ripe cuttings are taken later, when the current season’s growth has begun to mature and the base of the cutting has started to become firmer.
This difference is important because young stems lose water quickly, while more mature stems are better able to withstand drying out.
The Three Types of Cutting
| Feature | Softwood | Semi-ripe | Hardwood |
| Stem condition | Young, soft, flexible | Firming at base, softer towards tip | Fully mature, woody |
| Typical timing | Spring to early summer | Mid to late summer | Autumn to winter |
| Growth stage | Active growth | Partially matured growth | Dormant or fully matured growth |
| Main challenge | Preventing drying out | Balancing moisture and rooting | Slow rooting |
| Typical length | About 5–10 cm | About 7–15 cm | About 15–30 cm |
| Leaves | Usually retained at the top | Usually retained at the top | Usually absent |
| Rooting speed | Often relatively fast | Moderate | Usually slower |
| Humidity requirement | High | Moderate to high | Generally lower |
| Examples | Fuchsia, Pelargonium, many perennials and shrubs | Lavender, rosemary, many shrubs | Blackcurrant, willow, dogwood |
Exact timing and technique vary between plant species.
Softwood Cuttings
What is softwood?
Softwood is the young, actively growing tissue produced during the current growing season.
It is usually:
- green
- flexible
- relatively soft
- actively growing
- easily damaged
- quick to lose water
This makes it excellent propagation material, but it also creates the main challenge.
Softwood cuttings can dry out very quickly.
When are softwood cuttings taken?
Softwood cuttings are generally taken during spring and early summer, when plants are producing vigorous new growth.
The ideal material is neither extremely soft nor already becoming woody.
A useful practical test is to bend the shoot gently.
Very soft tissue may bend without resistance and collapse easily. Suitable material should have some firmness while still being flexible.

Taking a Softwood Cutting
1. Select healthy material
Choose vigorous, disease-free young growth.
Avoid flowering shoots where possible, as the plant’s energy may be directed towards flowering rather than vegetative growth.
2. Take the cutting
Use clean, sharp secateurs.
Cut below a node.
3. Prepare the cutting
Remove the lower leaves.
Retain a small number of leaves towards the top.
Large leaves can sometimes be reduced to lower water loss.
4. Apply rooting hormone if appropriate
Some plants root readily without hormone, while others may benefit from it.
Always follow the product instructions.
5. Insert into the growing medium
Use a suitable, free-draining rooting medium.
6. Maintain humidity
This is particularly important.
Because softwood has a high water content and limited ability to replace water before roots form, maintaining humidity reduces water loss from the leaves.
Semi-Ripe Cuttings

What does semi-ripe mean?
Semi-ripe cuttings are taken from current-season growth that has begun to mature.
The base of the shoot has started to become woody, while the tip remains comparatively soft.
If you run your fingers down the stem, you can often feel the difference:
soft tip → firmer middle → woody base
This is the characteristic feature of a semi-ripe cutting.
When are semi-ripe cuttings taken?
Semi-ripe cuttings are generally taken from mid to late summer, although the exact timing depends on the species and growing conditions.
The plant has had time to produce new growth, but that growth has not yet become completely woody.
This gives the cutting a useful compromise:
- the stem is firm enough to resist rapid dehydration
- the tissue is still young enough to root relatively readily
Taking a Semi-Ripe Cutting
1. Select the correct shoot
Choose healthy current-season growth.
The base should be firming but not completely woody.
2. Prepare the cutting
Cut below a node.
Remove the softer growing tip if it is unsuitable.
Remove lower leaves, leaving leaves at the top.
3. Reduce leaf area if necessary
Large leaves can be reduced to decrease water loss.
However, enough leaf area must remain for photosynthesis.
4. Insert into suitable medium
Use a free-draining rooting medium that retains sufficient moisture.
5. Maintain humidity
Semi-ripe cuttings still require protection from excessive water loss, although usually less humidity is needed than for very soft material.
Why do leaves matter?
Leaves create the plant’s energy through photosynthesis, but they also lose water through transpiration.
A cutting has leaves but initially has no functioning root system.
This creates a problem:
Leaves lose water → roots cannot yet replace it → cutting wilts
The propagation environment therefore needs to reduce excessive water loss while allowing sufficient light and air movement.
This is why misting, humidity domes, propagators or sheltered conditions may be used.
However, permanently saturated conditions can encourage fungal problems.
The aim is not simply to keep the cutting wet.
The aim is to keep it alive while it grows roots.

The Role of the Node
The node is the point on the stem where leaves and buds develop.
Nodes contain tissues capable of producing new growth and, in many plants, can contribute to the development of adventitious roots.
This is why cuttings are normally prepared with at least one node positioned appropriately within the rooting medium.
A simple rule for students is:
Look for the node before you make the cut.
Softwood vs Semi-Ripe
| Softwood | Semi-ripe |
| Very young growth | Partially matured current-season growth |
| Usually spring/early summer | Usually mid/late summer |
| More delicate | More robust |
| Loses water rapidly | Loses water more slowly |
| Often needs high humidity | Usually needs controlled humidity |
| Often roots quickly | Usually roots at a moderate rate |
| Requires careful handling | Generally easier to handle |
| Commonly retains several young leaves | Usually retains fewer, more mature leaves |
Softwood, Semi-Ripe and Hardwood: The Easy Way to Remember
Think about a stem through the growing season:
SPRING
🌱 SOFTWOOD
Young, green and actively growing.
↓
SUMMER
🌿 SEMI-RIPE
Beginning to mature and become firmer.
↓
AUTUMN / WINTER
🌳 HARDWOOD
Fully mature and woody.
This is a useful model, but plant species and weather can change the exact timing.

Suitable Equipment
| Equipment | Purpose |
| Sharp secateurs | Taking clean cuttings |
| Knife | Making precise cuts where appropriate |
| Propagator | Maintaining suitable rooting conditions |
| Misting system | Reducing excessive water loss |
| Pots/trays | Holding rooting medium |
| Free-draining medium | Providing moisture and aeration |
| Labels | Recording plant and date |
| Dibber | Making planting holes |
| Rooting hormone | May encourage rooting in some species |
| Watering equipment | Maintaining moisture |
PPE and Health & Safety
Propagation is generally a low-risk horticultural activity, but safe working practices are still required.
| Hazard | Possible risk | Control / PPE |
| Secateurs | Cuts | Keep tools sharp and maintained; use correct technique |
| Knives | Serious cuts | Cut away from the body; use a controlled technique |
| Thorny plants | Punctures and scratches | Suitable gloves and long sleeves |
| Growing media | Dust and microorganisms | Gloves; avoid creating dust |
| Rooting products | Skin or eye contact | Follow label and COSHH requirements where applicable |
| Wet floors | Slips | Clean spills and maintain good housekeeping |
| Repetitive cutting | Hand or wrist strain | Use appropriate tools and avoid excessive force |
PPE should be based on the actual risk assessment and task requirements.
Common Mistakes
Taking cuttings from unsuitable material
Weak, diseased or flowering material may give poor results.
Allowing softwood cuttings to wilt
This is one of the most common causes of failure.
Too much water
A cutting requires moisture, but its developing roots also require oxygen.
Too much leaf
Large quantities of leaf can increase transpiration.
Too little leaf
Removing every leaf prevents the cutting from carrying out effective photosynthesis.
Poor hygiene
Dirty tools and containers can transfer pathogens.
Incorrect timing
The difference between softwood and semi-ripe material is about the condition of the stem, not simply a date on the calendar.
Student Practical Checklist
Before starting:
☐ Have I identified the plant?
☐ Is the parent plant healthy?
☐ Am I taking the correct type of cutting?
☐ Is the material softwood or semi-ripe?
☐ Have I selected healthy current-season growth?
☐ Are my tools clean and sharp?
☐ Have I cut below a suitable node?
☐ Have I removed the correct leaves?
☐ Is my rooting medium suitable?
☐ Have I labelled the cutting?
☐ Can I maintain suitable humidity?
☐ Is drainage adequate?
☐ Am I using the correct PPE?
Practical Activity
Take:
3 softwood cuttings
and, where appropriate,
3 semi-ripe cuttings
from an approved plant.
Record:
Plant: ______________________________
Date: ______________________________
Type of cutting: Softwood / Semi-ripe
Length: ______________________________
Number of nodes: ______________________________
Number of leaves retained: ______________________________
Growing medium: ______________________________
Rooting environment: ______________________________
PPE used: ______________________________
Compare the two types
Which cutting material was:
Easier to prepare?
More likely to wilt?
More flexible?
More woody?
Which produced roots first?
Why do you think this happened?
The Golden Rule
When taking cuttings, don’t simply ask:
“What month is it?”
Ask:
“What is the plant doing?”
Is it producing soft, vigorous new growth?
Is that growth beginning to mature?
Or has it become fully woody and entered dormancy?
Understanding the biology of the plant is more useful than memorising a calendar.
A skilled propagator recognises the condition of the plant and chooses the appropriate technique.
Softwood is young and vigorous.
Semi-ripe is beginning to mature.
Hardwood is mature and woody.
Once you understand that progression, the three techniques become much easier to remember.
Key references
- Royal Horticultural Society (RHS), guidance on plant propagation and cuttings.
- Royal Horticultural Society (RHS), Propagation by Cuttings.
- Hartmann, H.T. et al., Plant Propagation: Principles and Practices.
- Toogood, A. (ed.), RHS Propagating Plants.
Health and Safety Executive (HSE), guidance on workplace PPE and safe use of hand tools.
Leaf and Petiole Cuttings
What are leaf and petiole cuttings?
Leaf and petiole cuttings are methods of vegetative propagation. Instead of using a piece of stem, the gardener uses a leaf, or a leaf together with its petiole, to produce a new plant.
They are particularly useful for certain ornamental plants and are a good example of how remarkable plant tissues can be.
The important principle is that not all leaves have the ability to produce a new plant.
Some plants contain cells capable of producing new roots and shoots from leaf tissue, while others do not.
Common examples include:
- Begonia
- Saintpaulia (African violet)
- Sansevieria
- Streptocarpus
- Peperomia
- some succulents
The exact method depends on the plant.

Leaf Cuttings vs Petiole Cuttings
The first distinction students need to understand is simple.
Leaf cutting
A leaf cutting uses the leaf blade itself as the propagation material.
Parts of the leaf are placed onto or into a suitable growing medium and new plantlets develop from appropriate tissues.
Petiole cutting
A petiole cutting uses the petiole, the stalk connecting the leaf blade to the stem.
The petiole is separated from the parent plant and inserted into the growing medium. Under suitable conditions, roots and new shoots can develop.
Understanding the Leaf
Before taking a cutting, it is useful to understand the basic structure of a leaf.
A typical leaf consists of:
Leaf blade (lamina)
The broad, flat part of the leaf.
Petiole
The stalk connecting the leaf blade to the stem.
Midrib
The main vein running through the leaf blade.
Veins
The network carrying water, minerals and manufactured sugars through the leaf.
This structure matters because different propagation techniques make use of different parts of the leaf.
Why use leaf cuttings?
Leaf cuttings are useful because they allow a gardener to produce several new plants from relatively little parent material.
They can be particularly useful when:
- the parent plant is small
- propagation material is limited
- the plant naturally produces plantlets from leaves
- large numbers of plants are required
- the characteristics of the parent plant need to be maintained
As with other forms of vegetative propagation, the resulting plants are normally clones of the parent plant.
Leaf Cuttings
There are several different ways of taking leaf cuttings.
The technique must be matched to the plant.
Whole leaf method
A healthy leaf is removed from the parent plant and placed onto the growing medium.
New plantlets may develop from the leaf under suitable conditions.
This method is particularly associated with plants such as some Begonias and succulents.
Leaf section method
A leaf can sometimes be divided into sections.
The sections are placed onto or into the growing medium.
Each section may produce new plantlets if it contains the appropriate tissues.
This is particularly useful with some Begonias.
Leaf vein method
With certain plants, the major veins are important to successful propagation.
The leaf can be placed on the growing medium with the underside in contact with the surface.
The major veins may then be cut or damaged at intervals.
New plantlets can develop from the wounded areas where suitable tissues are present.
This method demonstrates an important principle:
A leaf is not simply a flat green surface. It contains living tissues capable of responding to injury and producing new growth in some plants.

Petiole Cuttings
A petiole cutting uses the stalk of the leaf.
The technique is particularly useful for plants such as African violets and some other ornamental plants.
Step 1 — Select the leaf
Choose a healthy, mature leaf from the parent plant.
Avoid very young or damaged leaves.
Step 2 — Remove the leaf
Use a clean, sharp tool.
Leave a suitable length of petiole attached to the leaf.
Step 3 — Prepare the petiole
Trim the petiole cleanly if necessary.
Step 4 — Insert the petiole
Place the petiole into a suitable, moist but free-draining rooting medium.
The leaf blade should remain above the medium.
Step 5 — Maintain suitable conditions
Provide warmth, light and appropriate humidity without creating permanently waterlogged conditions.
Step 6 — Wait for new growth
Roots develop first or alongside new plant growth, depending on the species.
Eventually, small plantlets may develop.
What is happening biologically?
The success of leaf and petiole cuttings depends on the plant’s ability to produce adventitious roots and shoots.
Plant cells are capable of remarkable changes in function. Under the right conditions, cells can contribute to the development of new organs.
The cutting must therefore balance several demands:
Water → respiration → photosynthesis → root development → shoot development
Initially, there may be no roots to absorb water.
The leaf therefore needs to remain hydrated while the new plant develops.
At the same time, excessive moisture can reduce oxygen availability and encourage fungal or bacterial problems.
The Importance of the Leaf
Leaves perform several important functions.
Photosynthesis
The leaf captures light energy and produces carbohydrates.
Transpiration
Water is lost from the leaf through stomata.
Gas exchange
Carbon dioxide enters and oxygen leaves through stomata.
Storage
Some leaves can store water or nutrients.
These functions explain why the propagation environment must be carefully managed.
A leaf needs enough light to remain functional, but excessive light can increase water loss.
Leaf and Petiole Cuttings: Key Differences
| Leaf cuttings | Petiole cuttings |
| Use the leaf blade as propagation material | Use the leaf stalk/petiole |
| Leaf may be whole or divided | Petiole is normally inserted into the medium |
| Some methods use leaf veins | The petiole provides the connection to the leaf blade |
| Common with some Begonias and succulents | Common with African violets and similar plants |
| New plants develop from suitable leaf tissues | New plants develop from tissues associated with the petiole |
| Technique varies considerably between species | Usually requires a healthy leaf with suitable petiole |
Leaf Cuttings vs Stem Cuttings
| Leaf / petiole cuttings | Stem cuttings |
| Use leaf tissue | Use stem tissue |
| Suitable for particular plants | Suitable for a wider range of plants |
| Can produce several plants from one leaf | Usually produces one plant per cutting |
| Requires suitable regenerative tissues | Nodes are usually important |
| Often used for ornamental plants | Used widely for shrubs, perennials and fruit plants |
| Technique is highly species-specific | Techniques include softwood, semi-ripe and hardwood |
Environmental Conditions
Successful propagation depends on controlling the environment.
Moisture
The cutting must remain hydrated.
Humidity
Higher humidity can reduce water loss, particularly while roots are absent.
Temperature
Warm conditions may encourage rooting, although the ideal temperature varies between plants.
Light
Adequate light is required to maintain healthy leaf tissue and support photosynthesis.
Drainage
The growing medium must not remain permanently saturated.
Hygiene
Clean tools and containers reduce the risk of disease.
PPE and Health & Safety
Leaf and petiole propagation is generally low risk, but normal horticultural safety procedures still apply.
| Activity | Hazard | Control / PPE |
| Cutting leaves | Cuts from knives or secateurs | Use sharp, suitable tools correctly; gloves where appropriate |
| Handling plants | Sap, thorns or irritation | Suitable gloves where necessary |
| Preparing rooting medium | Dust | Avoid creating dust; gloves; eye protection where appropriate |
| Using rooting products | Skin or eye contact | Follow product label and COSHH requirements where applicable |
| Watering | Wet surfaces | Clean spills and maintain good housekeeping |
| Repetitive propagation | Hand or wrist strain | Use appropriate tools and take breaks |
PPE should be selected according to the actual risk assessment.
Common Mistakes
Using the wrong plant
Not every plant can be propagated successfully from a leaf or petiole.
Using unhealthy leaves
Diseased or damaged leaves are poor propagation material.
Cutting the leaf incorrectly
Different species require different methods.
Too much water
Wet does not mean healthy. Roots require oxygen.
Too little moisture
Leaf tissue can dry rapidly before roots develop.
Excessive humidity without ventilation
This can encourage fungal and bacterial problems.
Too much sunlight
A cutting without roots can struggle to replace water lost through transpiration.
Poor labelling
When several propagation experiments are being carried out, labels become essential.
Practical Activity
Part 1 — Leaf Cutting
Take an approved leaf cutting.
Record:
Plant: ______________________________
Date: ______________________________
Type of leaf cutting: ______________________________
Leaf size: ______________________________
Growing medium: ______________________________
Method used: ______________________________
PPE: ______________________________
Environmental conditions: ______________________________
Part 2 — Petiole Cutting
Take an approved petiole cutting.
Record:
Plant: ______________________________
Date: ______________________________
Petiole length: ______________________________
Number of leaves retained: ______________________________
Growing medium: ______________________________
PPE: ______________________________
Environmental conditions: ______________________________
Observation Record
Observe your cuttings over several weeks.
| Date | Leaf condition | Root development | New shoots/plantlets | Action taken |
Student Questions
1. What is the difference between a leaf cutting and a petiole cutting?
2. Why is a healthy parent plant important?
3. Why must the cutting not be allowed to dry out?
4. Why can too much water be a problem?
5. Why are leaf cuttings not suitable for every plant?
6. What is the role of the leaf in photosynthesis?
Remember
A leaf may appear to be a simple structure, but it is a living organ carrying out photosynthesis, gas exchange and water regulation.
In the right plants, it can also become the starting point for an entirely new plant.
The important lesson is that propagation is not simply about cutting something off a plant and putting it in compost.
The gardener must understand:
the plant → the tissue → the technique → the environment
Get those four things right and the chances of successful propagation increase considerably.
Look at the plant first. Then choose the cutting method.
Key references
- Royal Horticultural Society (RHS), guidance on plant propagation and cuttings.
- Hartmann, H.T. et al., Plant Propagation: Principles and Practices.
- Toogood, A. (ed.), RHS Propagating Plants.
- Taiz, L. et al., Plant Physiology and Development.
- Health and Safety Executive (HSE), guidance on PPE and safe use of hand tools.